[lwptoc]
1. Task Management
By default, task management service is off, so first user needs to subscribe the service (ON).
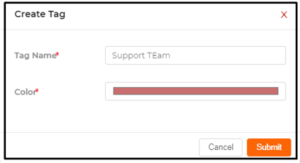
In setting option there is one option from where user can add the tag like for what the task are assignee to the tag, For E.g.: Account, Finance, Networking, Marketing, Sales, Support Team. It would be easy to identify for which department the task is, while creating the tag user need to select the colour and name for tag.
Once the Tag is created user can edit and delete the tag easily from the list.
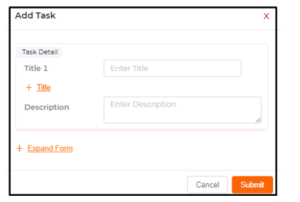
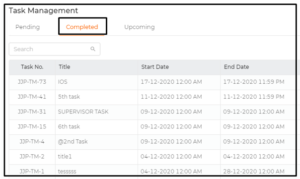
Now, user can create task from task management as it is located at side menu. In Task Management user have 3 option pending complete and upcoming tab, so it will be empty till user do not create any task. while scheduling the task user need to add the information Title, description, and other information as well (By expand the form).
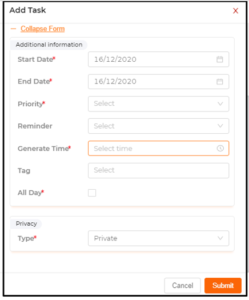
Once user Expand the form they get the form information like: Start Date (from when task need to start), End Date (on which date task should be delete), Priority(Priority of task is High, Low, Medium) Reminder (remind before 2hrs,3hr..etc), Generate tine( On which time task should be generate need to add), Tag( Which we added in setting will display here so need to select any one tag), All day (It will show when you need this task be work option are added Like: daily, weekly. Etc), and last Type (Type of task is Private or public).
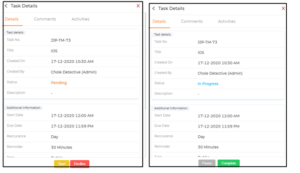
Task will display in upcoming list, while click on that user will get the detail information of the task information Like: Task detail (Title, create on, create by, Description) and Additional information (Start Date, Due Date, Recurrence, Reminder, Type, Tag and Priority)
User will get button to start or delete the task, it is depending on access. Once the user starts the complaint, they have to option Pause and complete. Once user click on complete then complaint move to completed tab.
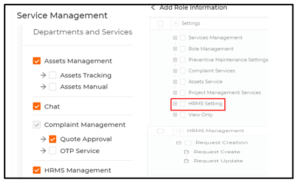
2. Request Management
In Master Portal we have the option for Dynamic form where user can contact us and then we have provide them form if needed. In Master Portal we have the option for Dynamic form where user can contact us and then we have provide them form if needed.
Settings:
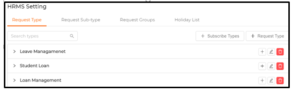
In Setting Option there is option for setting the Request type, Request Subtype, Holiday List, Request Group type. From where use can add the type of request: Leave Request, Loan Request, Complaint Request etc, need to add the subtype of that request type. From setting HR or Super admin can add the Holiday list can add the approval team and apply team.
Add Settings:
Add Request:
In Request Management user have the option to add the request in three different Steps.
Where they have to add the request type in first step, in second step user need to add the sub-request type, Date Amount and different dynamic data as per first step.
Step 1: My Request Type
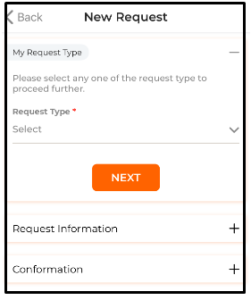
Step: 2 Request Information
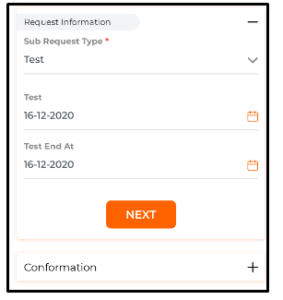
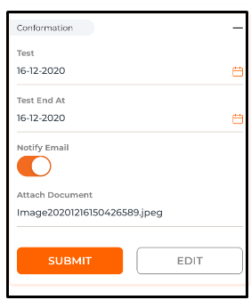
Step: 3 Conformation
In third step user need to conform the Request Information and can submit the form.
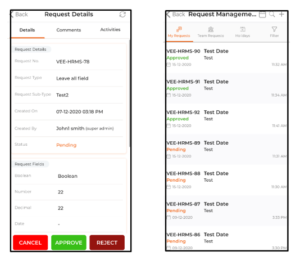
Approve or Reject: Once the Request is added then Approval team need to approve or reject the request If, they approve then the Requested person will know that request is accepted and if the approval team reject the ticket then they need to add the reason for the reject.
Cancel the Request: Once the user add request and if he need to cancel the request then user can click on the ticket and then can cancel the ticket.
Header: In the headers, there are 4 tabs like: “My Request”, “Team Request”, “Holiday”, “Filter”.
My Request: In this tab user can view their own request which they have added will get the list.
Team Request: If the user have role of (Store owner, super admin) higher person then, he will get the request of their team members.
Holiday: Here user will get all the list of holidays.
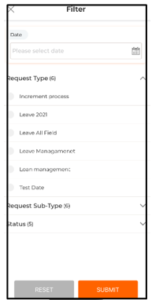
Filter: User can filter the data base on date, request Type and request Subtype.
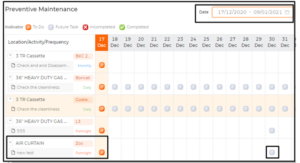
3. Preventive Maintenance
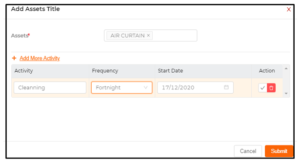
In Preventive Maintenance, we have option in setting for Frequency which are
As needed, Weekly, Monthly, Quarterly, Half-Yearly, Yearly. So now we have added one more option between Weekly and Monthly which is “Fortnight”.
If any user needs the scheduling on fortnight they can do from setting and can do the performance like pass fail the PM which they do usually.
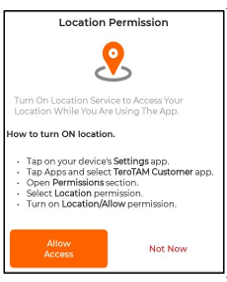
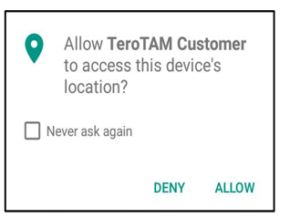
4.Staff Location Tracking
In Staff Tracking we can track the location of staff by using this module. We have added few better options in tracking which user need subscribe once from the setting.
In setting we have option for the Location Services are: Type, Weekday, Start Time, End Time, Interval.
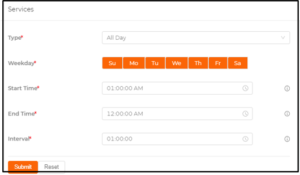
Once the setting done and user have to check and allow the access from application so we can track the location properly and get the log of the user location.
5. Analytics Report Dynamic Column
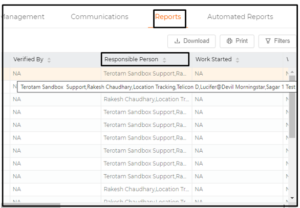
In report we have option of filter in that we tab for complaint, where we have added on field name as “Responsible Person” and in drop-down there is list of roles, will select all roles/select single role, select multiple roles, and then need to submit it.
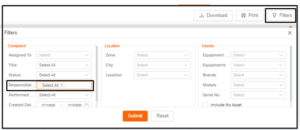
User will get the report list with one dynamic column name “Responsible Person” in that list it may have one name multiple name that will base on access of ticket and selection of roles.
6. Complaint Assignee and Delete
6.1 Delete Complaint
As per the current flow, if we have auto-assign to the vendor and that time we have no option to delete complaint, so we need improvement in the system and add delete option.
Note- We have to check Internal Team and the Service provider team all points.
6.2 Complaint Assignee for Internal team and external team
We have 2 diff flows in the compliant assignment.
If complaints have internal and external assignee flow, that time we have to select one vendor and internal staff assign it.
If complaints have auto assignee to the vendor that time we have multiple vendor assignees there and no internal team assignee there.
So, we need to make the same login for both, complaint is auto-assign to a vendor or only an internal team, we have to show both options. just check service provider service on.
Note- If customers have service provider service off then we do not need to show the service provider option on the assignee screen.
Add Submit or Assignee change button in this screen and click to ask conformation and change it, now we check in selection.
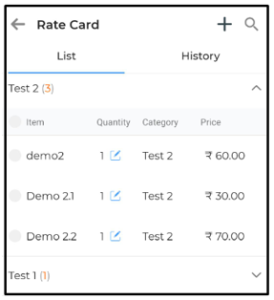
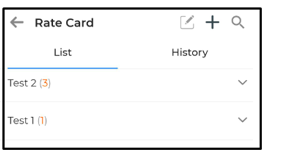
7. Rate Card Expand & Collapse
In rate card list where all assets list are added but in that where more that 15 records so if user need to view the list its hard scroll so we have added the feature in design for expand and collapse so it will be easy to identify the data.