[lwptoc]
1. Download Preventive Maintenance Charts:
In Preventive Maintenance, there are multiple charts available based on user requirements which enable to download the charts with all the detailed information. For all the charts below.
The Charts will have a field to be selected based on charts that can be download. Here are the charts listed below:
- PM OPEN VS PAUSED
- PM PASSED VS VERIFIED
- PM PASSED/FAILED ACTIVITY
- PM OPEN/PASSED ACTIVITY
- LOCATION MANAGEMENT – MOST ACTIVITY
- LOCATION MANAGEMENT – MOST
- EMPLOYEE PASSED ACTIVITY
- PM TOP-MOST ACTIVITY
- EMPLOYEE AVERAGE TIME
- TOP MOST CHECKLIST
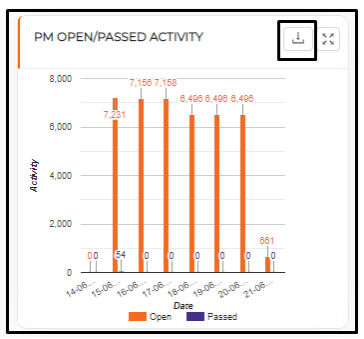
Figure1.1 Analytics>>Preventive Maintenance
The charts have common columns to list out which are mentioned below:
1. Accepted / Deleted
2. Accepted / Deleted At
3. Accepted / Deleted By
4. Assigned At
5. Assigned By
6. Brands
7. Checklist Name
8. City
9. Complaint No.
10. Created At
11. Created By
12. Equipment Category
13. Equipment’s
14. Internal Staff Name
15. Internal Team Name
16. Location Management
17. Models
18. PM Schedule Date
19. Report
20. Response Time
21. Serial No
22. Service Provider Name
23. Status
24. TAT Hour
25. Ticket No.
26. Time Taken
27. Time Taken (TAT)
28. Title
29. Verified At
30. Verified By
31. Within TAT
32. Work Completed At
33. Work Completed By
34. Work Start By
35. Work Started At
36. Zone
Figure1.2 Analytics>> Preventive Maintenance>>Download
2. SCA (Store Condition Assessment):
In SCA there is the option for adding the escalation based on level, where the user can get Email.
a. Setting>>Escalation Management>>Preference: In the setting, there is the option to select the service of SCA, once the service is on, then the Tab will appear, and by default, it will be off.
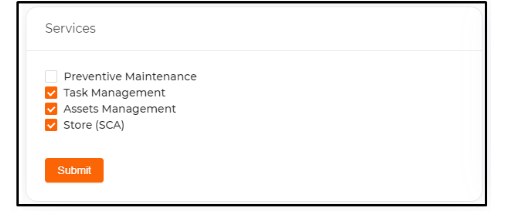
Figure 2.1 setting>>Escalation Management>>Preference
b. Setting>> Escalation Management>>Add Level: In setting there is the option of SCA in a tab where user can do setting for specific for SCA, add “+ Level” and then fill the form as listed Level Name, Staff, Hours, Status then submit.
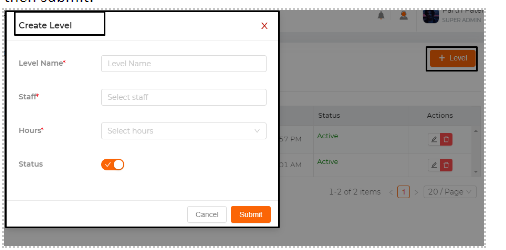
Figure 2.2 setting>>Escalation Management>>Add Level
c. Escalation Management>>SCA: In Escalation need to add the escalation for SCA tickets, Add Escalation where user need to add Module, SCA, Level, TAT Hours, Email service for consolidate Email:
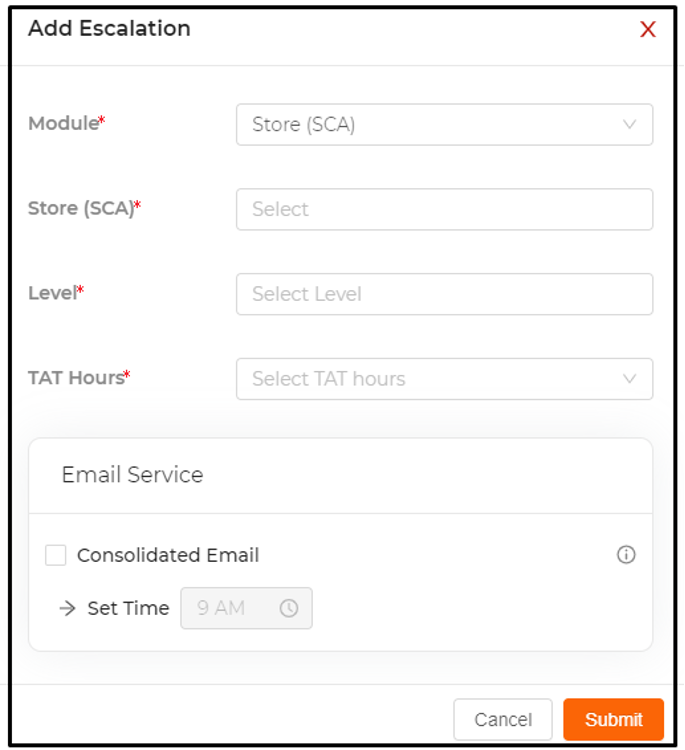
Figure 2.3 Escalation Management>>SCA
3. SOA and AP (Statement of Account and Account Payable):
In SOA and AP, divide into 2 phases, where in the first phase we have cover below 12 points and in the second phase we are going to cover another 7 points.
a. Setting>> SOA>> Preferences: In Preference, there is the option of Approval where there are 2 options in the service which are as below
i. Do you need an approval strategy for SCA Approval? By details, the service will be off once users on that they can have access to the approval flow in the new tab.
ii. Do you need to reopen Service after SCA approved/verified?
1. Select hours and submit
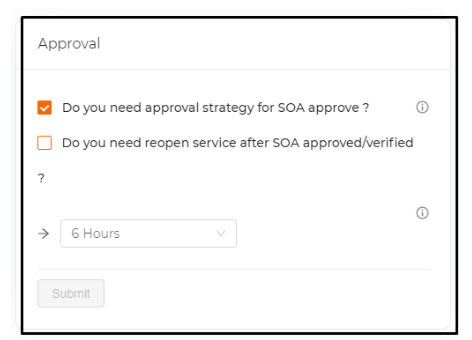
Figure 3.1 setting>>SOA>>Preference
b. Setting>> SOA>>Approval flow: Once the user done with preference setting they will move to this tab.
i. Add Level: From there the user can add the level like Level name, Staff, Strategy Type and submit
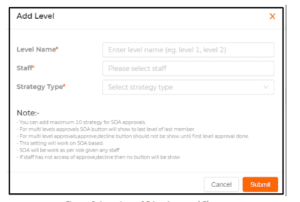
Figure 2.1 setting>>SOA>>Approval Flow
c. Account>> Statement of Account: The SOA is created by the vendor side. After that, the user can get a ticket in pending status and follow the step like Approved/ Decline, On Decline, it will ask the reason and it will remove but once the user Approves, then there will be an option to verify that ticket. Once the user verifies it, then the user has to add a comment.
d. Reupload and Requested: User can add the re-request and also can add the re-upload the document if need
e. Filter: In filter option user can filter information like, select service provide, Created Date, Statement Date, and Status and the user can filter select information on the listing screen.
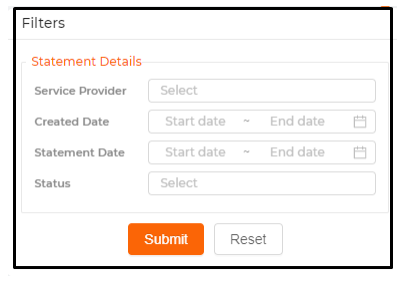
Figure 3.2 SOA>> Filter
4. Support ticket for customer service provider and Master
If any customer has any queries, then they can contact us through a support ticket:
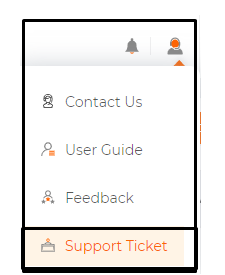
Figure 4.1 Support Ticket
a. Create Ticket: Once the user clicks on the support ticket then, the support module will open from where any customer can contact TeroTAM Admin for any query by raising the ticket with the information of Ticket Title, Ticket description, Browser type, Attachments and submit.
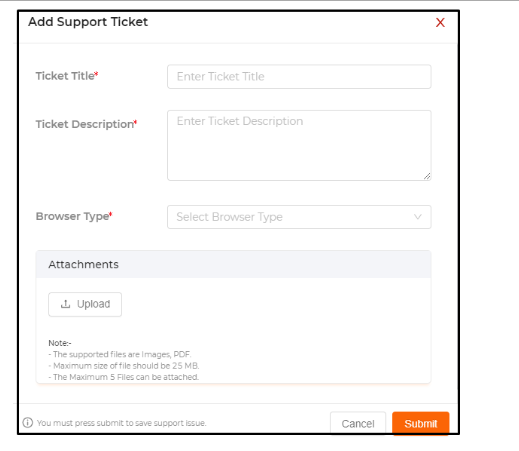
Figure 4.2 Create Support Ticket
b. Details of Ticket: The ticket is visible to the customer as well as to the admin team. They will check and start the work. After that they will update the ticket and again the customer can check the issue.
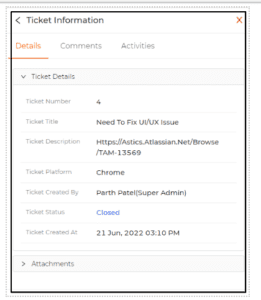
Figure 4.3 Detail of Support Ticket
5. Performance Improvement:
a. DB version update + memory optimization
6. Bugs:
a. Invoice Re-open option missing even though the invoice is approved in 1st level
Next Sprint (22.6):
No. Task
1 Service Call report changes (page no. and attachment in new page)
2 Filter should have an internal staff option as well
3 Complaint to Project Management due to high TAT
4 SOA and AP phase 2
5 Android Improvement
6 iOS Improvement
7 Backend Improvement
8 Frontend Improvement