1. Work Permit:
The Work Permit is used as a gate pass or visitor management from where the user can enter any location with this Permit.
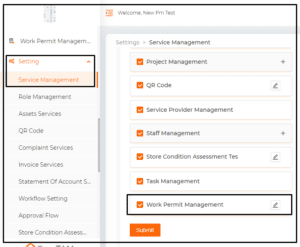
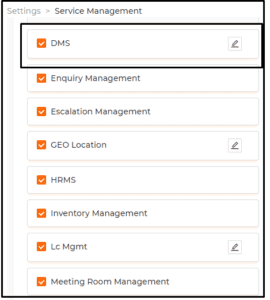
Setting>>Service Management:
In the setting, service management needs to provide the option of a work permit. By default, the service will be off. Once the user is on the service then, uses the functionality of a work permit, the name of the work permit can be edit easily.
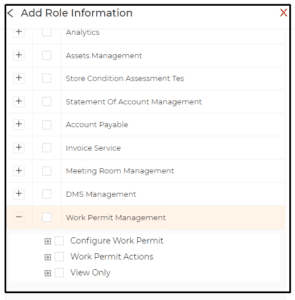
Setting>> Role Management:
In Role Management, you will have the option with all details of configuration and also the option of a work permit role.
Setting >> Work Permit>> Preference:
In Setting a work permit, there will be the option of Preferences form. There will be one default form, and also user can create multiple forms. Here below are the options which are included in the form.
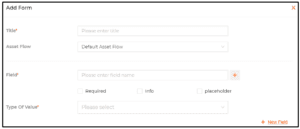
Form Details
- Title
- Assets flow
- Field:
- Type of value
- Advance option
- Do you need location management for a work permit?
- Do you need Location management mandatory?
- Do you need Area for a Work Permit?
- Do you need area mandatory?
- Do you need a description?
- Do you need description mandatory?

Figure 1.4: Setting>> Work Permit>>Preferences
- Do you need description mandatory?
- Do you need assets option to create a Work Permit?
- Do you need custom form detail in Work Permit?
- Do you need multiple Work permit on complaints?
- Do you need assignee flow?
- Do you need a module?
- Complaint Management
- Preventive Maintenance
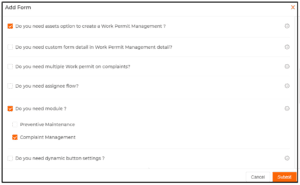
Figure 1.5: Setting>> Work Permit>>Preferences
- Do you need dynamic button settings?
-
- Button Name
- Approve
- Decline
- Delete
- Vendor Accepts
- Verify
- Revert
- Status Name
- Pending
- Approved
- Declined
- Deleted
- Vendor Accepted
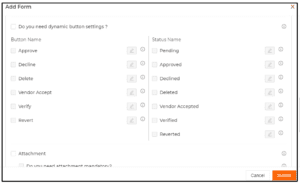
Figure 1.6: Setting>> Work Permit>>Preferences
- Button Name
-
- Attachment
- Do you need attachment mandatory?
- Attachment Type: Excel, PDF, DOC, CSV, TXT, Image, Video, Audio.
- Attachment Limit: Maximum –10, Minimum-1
- Validation Type: All, anyone
- Attachment Note: Use can add the text
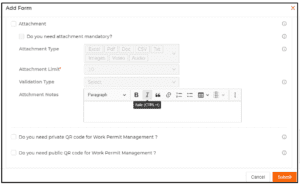
Figure 1.7: Setting>> Work Permit>>Preferences
- Do you need attachment mandatory?
- Do you need a private QR code for a Work Permit
- Do you need a public QR code for a Work Permit
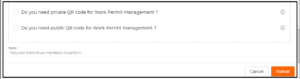
Figure 1.8: Setting>> Work Permit>>Preferences
- Do you need location management for a work permit?
The form can be edit delete, and do can add multiple activity in that form.
Main Module>>Work Permit:
The User can create the work permit from top right “+” button and the screen will open with details of the create option which is mentioned below. It will be based on the setting.
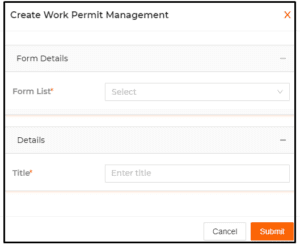
- Location details:
- Select Location
- Select Area
- Details
- Title
- Description
- Assigned to details
- Assigned to
- Staff/Service Provider
- Additional information: It will be based on setting form details.
- Attachment and submit
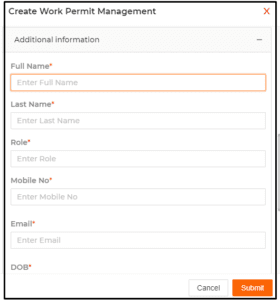
Figure 1.10: Create Work Permit
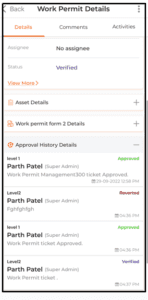
Once the work permit is created, there will be the option to approve or decline the ticket based on their available timing.
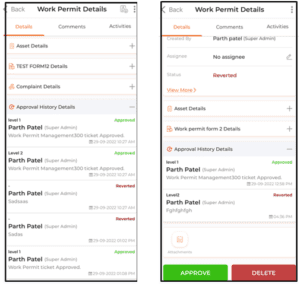
In the Approval flow, the user will have permission to enter the user in the premises of the client to perform any complaint, preventive or to having Metting. There will be the option of Icard or pass from which where user can have the approval.
There is multiple approval flow from more than one user to approve the work permit ticket.
If user decline then must need to add the reason.
ID card: On the ID card will have the details of the user who is going to visit the place with a work permit. In ID card will have details below, which are based on the setting, and below mentioned is default card information:
- First Name
- Last name
- Role
- Mobile No
- DOB
- Photo
The user can download the card and with that downloaded ID card option, user can enter the permission to that location.
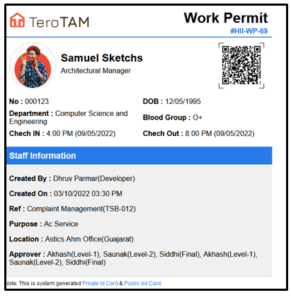
On ID card there will be one option of QR code, then the user can scan the QR code and check the work permit details.
The QR code is the Private and Public QR codes for the Work permit from where public the public used for all and the public can be used from the Tero TAM application.
2. DMS:
The feature is useful to store the document or can maintain the document from the client’s perspective view.
Setting>>Service Management:
In setting service management there is the option of DMS service which will be off by default, once the user on the service can use the module.
The user can edit the name of the DMS and can keep their convenient name based on their requirements.
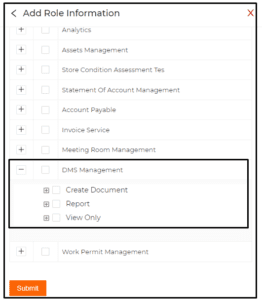
Setting >>Role Management:
In role management, user can have access to the DMS based on role.
Setting>>DMS>>Preference:
From preference, user can create their own form using the below information which is mentioned in detail.
- Title
- Assets flow
- Checklist Activity
- Type of Value

Figure 2.3: Setting>>DMS>>Preference - Advance Option
- Do you need assets while creating DMS?
- Do we need an Equipment category?
- Do we need Equipment brand?
- Do we need Equipment model?
- Do we need Equipment serial No?
- Do we need a location?
- Do we need location mandatory?
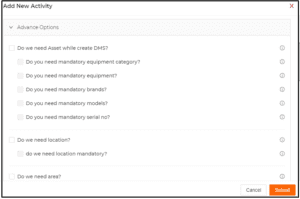
Figure 2.4: Setting>>DMS>>Preference
- Do we need location mandatory?
- Do we need an area?
- Do we need area mandatory?
- Do we need Description?
- Do we need description Mandatory?
- Do you need custom form detail in report?
- Do we need to reopen DMS after verify?
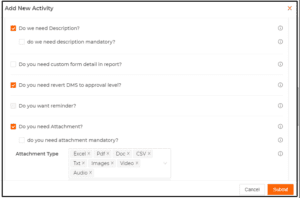
Figure 2.5: Setting>>DMS>>Preference - Dynamic Buttons
- Create DMS
- Accept
- Assign to
- Approve
- Verify
- Decline
- Delete
- Reopen
- Do you need to revert DMS to approval level?
- Do you want a reminder?
- Do you need Attachment?
- Do you need Attachment mandatory?
- Attachment type allow
- Attachment note will be in CKEdit6or.
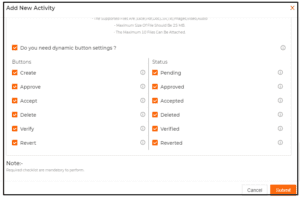
Figure 2.6: Setting>>DMS>>Preference
- Do you need assets while creating DMS?
Setting>>DMS>>DMS report:
User can create the report details using the information below.
- Title
- Checklist Activity
- Type of Value
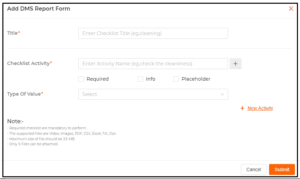
Figure 2.7: Setting>>DMS>>Report
Setting>>DMS>> DMS work flow:
In work flow there is the detailed information which is mentioned below
- Default setting type
- Service report header details
- DMS details
- Location details
- Assets details
- Activities
- Attachment
- DMS history
- Signature Details
- Footer details
- Submit
- Preview
- Reset
This all information can be edited and also user can delete the information as per their requirements.
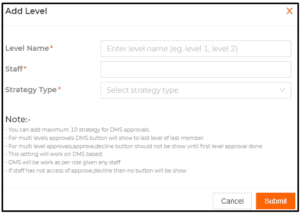
Setting>>DMS>>Approval Level:
In DMS there is an approval level for approving the document and it can be even done reverted.
Main Module>>DMS:
The DMS can be created from the top right “+” click and user will have the pop-up to create the DMS with the option of setting, which is mentioned below in detail:
- Form Details
- Form List
- Assets details
- Category
- Subcategory
- Brand
- Model
- Serial no
- DMS details
- Title
- Description
- Reminder Option
- Schedule Date
- Reminder Date
- Reminder
- Attachments
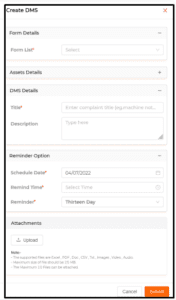
Figure 2.9: Create DMS
In Detail there will be option for approve and decline if user, decline it then need to provide the reason and if the user approves it then the user can have multiple approvals and in last approval there will be option of close the ticket
After approval the user can create the report with details of DMS ticket and also can download the report
In the history of the DMS, user can the details of the document which is added with details which are mentioned below:
- Attachment
- Level Name
- Staff Name
- Status
- Date
- Remark
3. Tabula report:
In Analytics there is the option of My reports from where users can create the dynamic report as per their need/requirements. In the dynamic report we have covered the 2 modules Assets management and complaint management with advance options which are mentioned below:
- Mathematical operation
- Count
- Date difference
- SUM
- Difference
- Average
- Min
- Max
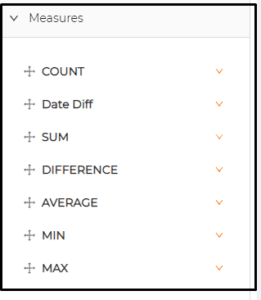
Figure 3.1: Analytics>>MY report>Add chart
- The charts can be created based on the information below
- Location access
- Current Date
- Assets information like
- Equipment,
- Category,
- Brand,
- Model,
- Serial no
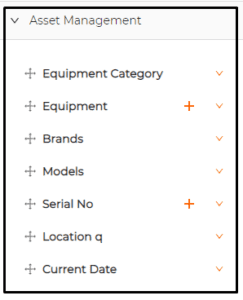
Figure 3.1: Analytics>>MY report>Add chart
- In Custom formula (operations) the charts can be created which are mentioned below: even users can create their own formula.
-
- Add
- Minus
- Multiply
- Division
- Equal
- Open bracket (
- Close bracket)
- Input
- Date Diff
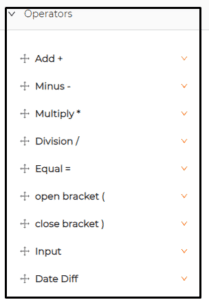
Figure 3.3: Analytics>>MY report>Add chart
-
- Filter has few basic data which is mentioned below
-
- Location
- Created Date
- Customize date
- Customize data
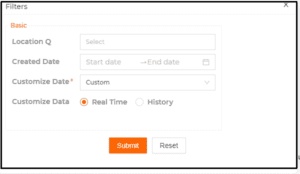
Figure 3.4: Analytics>>MY report>Add chart
-
Users can save the chart that they have created and also can view it wherever they want need it. Also, there is the option to download and share the chart with the user whoever has the same location, access.
4. Preventive Maintenance:
In Preventive Maintenance, there are multiple features that have been developed which are mentioned below in detail.
1. PM with custom multiple date selection:
In Preventive maintenance, user can have the option of selection date more than one date to perform preventive maintenance task.
1. Setting>>PM Setting>>Preference:
In preference, there is the option to ON the services for PM Multiple date selections. Do you need the option of a custom date in Preventive maintenance for scheduling? By default, the service will be OFF once the user is ON the service and then in activity.
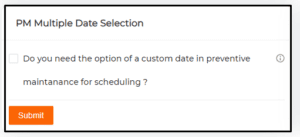
In Activity, there is the option of selecting the start date end data and multiple selections for PM.

2. PM Custom Report:
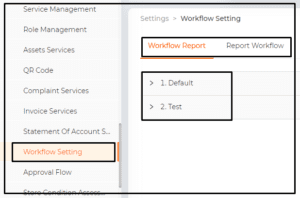
For the dynamic report in setting>>work flow Setting>> PM has added the option of dynamic report.
There are 2 tabs first is work flow report and second tab is Report Workflow.
-
- Workflow Report: there is one default flow and if a user needs any new flow can add it, even can edit the default flow. In the workflow report form, there will be the information below:
- Title
- Checklist Activity
- Type of Value (User can add multiple activity in the form
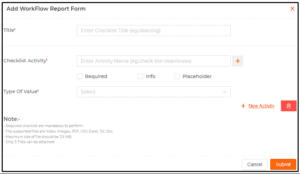
Figure 4.4: Setting>>Work flow setting>>work flow report
- Report Work Flow: In report work flow many settings are done based on PM default data is below mention which is editable
- Default Setting Type
- Service Report Header Details
- Image
- Address
- Title
- Customer Report No
- Service Provider Report No
- Date
- Customer Details
- Customer
- Address
- Zip Code
- Phone
- Location Details
- Name
- Area
- City
- Opening Date
- Store Email
- PM Activity Detail
- Ticket no
- Assets Name
- Activity
- Frequency
- Status
- Created At
- Perform Date
- Performed By
- PM Assets Name and Activity Details
- Ticket No
- Frequency
- Status
- Pass Reason
- Activity
- Created At
- Perform Date
- Perform By
- Location Name
- Attachment:
- Ticket No
- Image
- Uploaded By
- Role
- File type
- Date
- Signature
- Signature
- Signature By
- Name
- Date
- Divider
- Footer Details
- Workflow Report: there is one default flow and if a user needs any new flow can add it, even can edit the default flow. In the workflow report form, there will be the information below:
Once the Workflow Report setting is done, then user can submit preview or Reset the Report information.
Then the information which is added based on setting will be reflected on Preventive maintenance while PM is passed and the user create the report.
Users can see all the changes of setting in the Preventive Maintenance report.
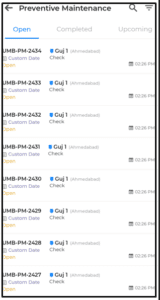
3. PM Vendor listing:
Once the user schedules or created the Preventive Maintenance successfully, then in the listing screen we have improved the performance as well as design.
4. Pm Attachment compress:
In Preventive Maintenance, while the user add an attachment in the checklist more than one, then the report size is getting high so to resolve this issue need to compress the attachment file and the report will compress itself.
-
- I had added 10 images of around 200 KB each.
- And the size of the generated report is 446 KB.
5.PM Location view removes:
In preventive Maintenace, there are three types of views to check the PM tickets. So, in the Listing screen have the option count from where the user can have the access to check the tickets of the same location at the vendor side, as of now select all option have been deleted from customer and vendor. And from vendor location view option has removed.
6. PM Performance Improve:
In the Preventive Maintenance we have added few server changes like remove few bulk operations due to that system can perform smoothly and Quick access.
7. PM Activity adds based on all details
In Preventive Maintenance, while licking on the “+” button there are 2 options one is for scheduling and anther one is added activity. If user clicks on the second one, then there will be new and few dynamic options to create the PM.
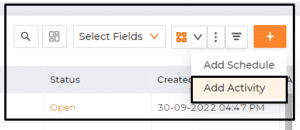
In the Add activity option, users need to select the details below which are mentioned:
-
- Location Details:
- Location
- Area
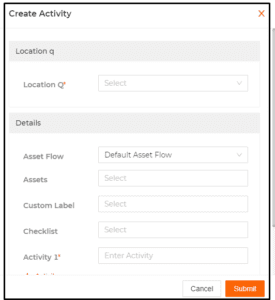
Figure 4.7: Preventive Maintenance>>Create/Add Activity
- Details:
- Assets Flow
- Assets
- Custom label
- Checklist
- Activity (can add more activity)
- Advance option:
-
- Frequency
- As needed
- Days
- Weekly
- Monthly
- Quarterly
- Yearly.
- Set Time
- TAT
Figure 4.8: Preventive Maintenance>>Create/Add Activity
- Frequency
-
- Location Details:
5. Complaint Management:
1. Complaint Management Counter:
In Complaint Management user can have the count on the complaint from the listing screen.
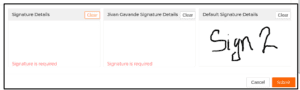
2. Multiple Signature in Complaint:
In Complaint we have to provide the information where user can do signature for 1 time or more than one time.
Setting>>Complaint Service: There will be the option for doing signature setting more than once, users can have multiple signatures.
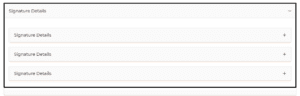
In the setting, there will be an option for Name, Date, Divider, Work completed by.
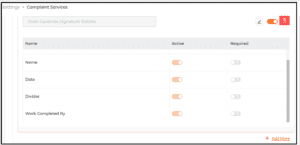
In the report, the user can view and perform multiple signatures.
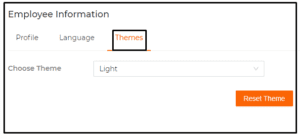
6. Dark Mode:
In dark mode, there is an option in the profile from which the user can change the color of the software to from light to dark mode. GOTO Profile and Select Themes.
Choose Themes light and Dark mode based on your need.
7. ANTD4:
In the Customer and Vendor portal, the system has adopted the new version of React.JS with new development in versions from antd3 to antd4. It will change the structure and design of tables, icons and other designs.
8. Location management:
In location Management user can have the new feature to add the attachment for the location.
Setting>>Location Management>>Additional Information: In Location management need to add the “+ Additional Information” the form will open with below detail which is mentioned.
- Title
- Checklist Activity
- Type of value

Figure 8.1: Setting>>Location Management>>Additional Information
Location Management: While creating the location there is the option of adding the attachment as well as the additional information which is mentioned below:
- Location Details
- Location Address
- Pin code
- Zone
- City
- Other information
- Cost center
- Store ID
- Opening ID
- Contact
- Phone
- Status
- Registered
- New Demo Form (it will be based on setting)
- Attachment

Figure 8.1: Location Management
9. SCA:
In SCA there are multiple selection options to select data from one or more than one to create SCA.
10. Backend Improvement:
-
- Asset escalation mail: Both flow’s asset category display in mail
- Backend Account: Assets flow selection should be show only when more than 1 assets flow added.
11. Android Improvement:
-
- Android 12 one-time permission dialog implementation
- Android customer: If user after click on overview that time pm listing page filter should be show
- Customer Android: Assignee edit option missing on description onsite inspection App0002 Test123
12. IOS Improvement:
-
- Selection issue on iOS customer app
- Customer iOS: Assignee edit option missing on description onsite inspection App0002 Test123
- IOS Customer: If user after click on overview that time pm listing page filter should be show
13. Frontend Improvement:
-
- Invoice: Invoice download and report download button, colour should be different.
- Frontend: – PM filter improvement: By default, all pm tickets should be shown on the pm & multiple flow select option should be shown on PM filter.
- Backend Account: Assets flow selection should be show only when more than 1 assets flow added.